
Not sure how to feel about your RAV4’s poorly lit interior? The factory-installed internal lights can often be too dim causing much frustration. But hold on, there is an upcoming solution to this problem.
Today, I want to bring the issue of Toyota RAV4 LED interior lights into the lime light (pun intended) and discuss some of the cooler options of interior lights on the market. Stick with me for the rest of the article to understand these options and light up your RAV4’s dim driving experience.
Which Brands to Choose from?
There are two big brands to choose from: AWALITED and Autogine. Both of these brands are reputable and have various interior lights in their packages. These include LED bulbs for the map, dome, cargo, vanity, and license plate. These brands both have the following qualities that make them a standout choice:
- They are 300% brighter
- Require no modifications for installation
- Come with a placement guide
- They are easy to install
I am also listing the qualities separately so you can see the comparison and make a better judgement on which one suits your more.
Note: If you have other brands in mind, make sure the bulbs you pick are compatible with the model of your RAV4. For exact measurements, it is better to consult your user manual or get some online instructions.
AWALITED
The AWALTED LED lights are a great addition to the interior, as these bright white lights do a great job of lighting up the RAV4’s interior. Their package contains 10 of these amazing LEDs.
These can fit well in all models of Toyota RAV4 from 2016 to 2022. Additionally, if you are not satisfied with it, you can simply return it, and you’ll receive your refund within 30 days without being questioned why.
Autogine
The Autogine LED lights have also earned their name as a popular aftermarket source of reputable LED lights. Their LED light packages come with a total of 8 LEDs.
They have two types of LEDs that fit different RAV4 models; one fits RAV4s from 2006-2015 and the other from 2016-2022.
Another great plus is the 2-year warranty on these lights. The estimated lifespan of these can last up to 40,000 hours, ensuring high customer satisfaction and rating.
Note: No matter which LED light you buy, the process of insertion will more or less be the same.
Necessary Materials
If you ordered from the LED kits I mentioned above, you should have 8-10 LED lights. Other than this, you will need to get a plastic wedge to aid you in the process.
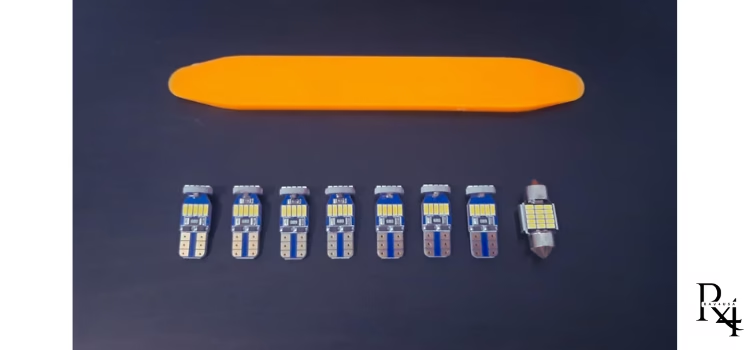
Note: To ensure the health of the light bulbs, you can wear gloves to prevent any oils from sticking to the bulb’s surface. Alternatively, you keep a clean microfiber cloth to wipe the bulbs.
Setting up for Installation of the LEDs
Here are a few precautionary steps to ensure you can replace the lights with safety and ease.
- Take your car to a bright place for better vision
- Make sure that your vehicle is switched off
- Consider disconnecting the battery to ensure a safe installation
- Keep the necessary tools with you
- Keep a small basket with you to toss in the old bulbs
Guide: Toyota RAV4 LED Interior Lights
Upgrade
Now let’s begin the guide, starting with the visor light, moving to the dome light, and then the cargo lights. And since we will be slowly progressing toward the more difficult steps, I have saved the map light installation for the end. Let’s get started!
1. Installing the Visor Lights
Let’s start with the two lights of the visor.
These are behind the visor lights and turn on when you slide the mirror lid.
To remove the lid, press the plastic wedge to the left side of the visor lid for both sides. It is necessary to insert it on the left side of the lid to unlock their hold.
Press the plastic wedge at the edge of the light cover to open the lid. Don’t worry, you won’t break it.
Once the visor light snaps open, pull down on the left side to reveal the lamp.
Tip: To simplify the removal of the lamp, I recommend that you release the “U-shaped” clip keeping the lid in place.
Once the lamp has been exhibited, you may simply remove it. You may need to wiggle it a bit, but remember this: don’t turn it.
Once the original bulb is removed, put it in the basket and place the new LED in the empty slot.
Tip: Before placing back the cover, make sure to test the LED light by sliding open the mirror lid. Remember to reconnect the battery if you disconnected it. If it works, “Et voila.” You now have a brighter visor light. If it doesn’t work, you can reinsert in the flipped position.
After you have ensured that the visor is working, repeat the process on the other visor light.
2. Installing the Dome Light
Moving on to the dome light, you will find this bulb on the top of the rear seats.
To open the light of the dome, you have to find two small notches on the lid. You can find these by moving your fingernails across the edge of the cover at the side of the switch to see where they are.
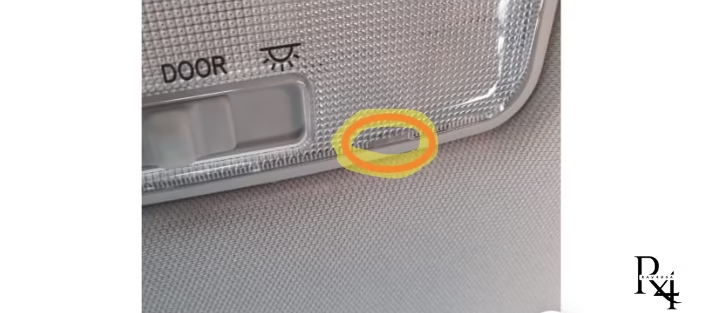
When you find these, press the plastic wedge against each notch to remove the old light dome cover.
The old bulb will be revealed now. To remove it, push the metal that maintains the light in position and pull out the lamp. Place the old bulb in the basket.
Place the new LED light at the lowest point.
Tip: If the metal is too inward, you can use the wedge to push it out a bit. This will help the new bulb fit in a more resistant position.
Note: If the LED light doesn’t work, you can flip it around 180 degrees to change its polarity.
3. Installing the Cargo Light
The cargo light is on the right side of the trunk. But just as the visor lights, you need to pry it from the left side to open the cover. This will remove the cover, revealing the light assembly.
Next, slide off the cover by putting your hand around it and pressing the edges of your fingers. After you see the original bulb, wiggle it out. Again, don’t turn it. Pull it out and put it in the small basket with you.
After installing the new bulb, test to see if it works. Don’t forget to plug back the battery in if you disconnected it. After testing, secure the case over it.
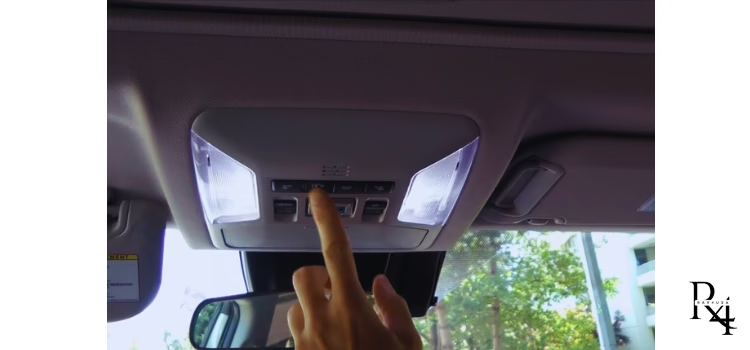
4. Installing Map Lights
There are two map lights in the RAV4; these are right above the gear shift. It is incorporated into a bigger element that contains different buttons and a support for sunglasses.
Before you start, you must keep in mind that the map light assembly file can vary depending on the year of the model and trim of the RAV4, etc. The map light assembly used to provide directions in this guide is the most common.
Start by taking out the cover of one side of the map light. You might have to apply force to only the edges of the light cover to remove it. Use your plastic wedge and start prying.
Now you will see the inner coming out. Don’t pull it out entirely. It will damage the connection with the rest of the assembly. Now take out the bulb and insert in the new one just like you did with all the other ones.
Next, before placing the cover back on, repeat the process for the map light on the other side. Make sure to add the used bulbs in the small basket with all the other halogen bulbs. Now insert the new bulb in the other map light bulb holder too.
Lastly, connect the battery if you disconnected to test the bulbs; if they don’t work, flip them 180 degrees. If they light, congratulations on the hard work!
Benefits of LED Lights
There are a few different benefits of installing these amazing LED lights on your RAV4. These are mentioned below:
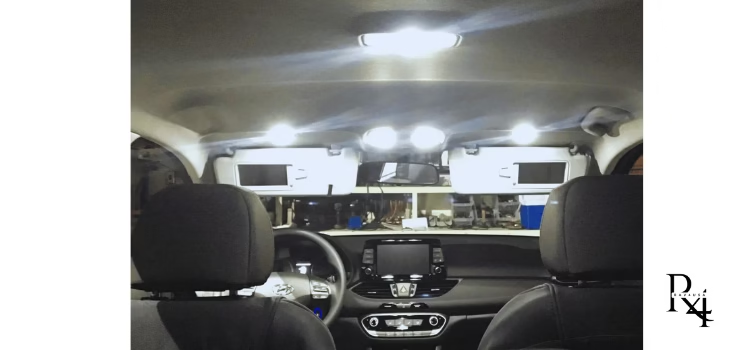
Better visibility and aesthetics
The LED lights tend to provide brighter visibility of the inside of the RAV4. This not only helps aid in the clarity of the surroundings but also adds richness to the aesthetics of the design of the interior.
Energy efficiency and sustainability
Besides being brighter and more appealing, LED lights usually last longer than the original halogen bulbs. This means they need fewer replacements, which is an economic plus.
Additionally, these bulbs tend to be lighter on the battery, requiring less energy input due to their energy efficiency. This adds an eco-friendly touch to them.
Maintenance Tips for Your New LED Lights
There are a few tips to keep in mind while using the new LED lights. These tips will help elongate the lifespan of the bulbs and keep them lighting up your driving experience:
- Regularly wipe the case of the light with a microfiber cloth to maintain their glow.
- To maintain the brightness, clean the light cover regularly with a microfiber cloth.
- Regularly check the lights to see if there are signs of dimming or flicking.
- To avoid uneven lighting, simply replace the faulty bulbs with new ones at the first instance of defection.
FAQs
Can I upgrade my car lights to LED?
Yes, you can upgrade your car light to LED. Just make sure that the LED bulbs are compatible with the model of your car. The brands mentioned in the article are compatible with most RAV4 models.
What is the cost of installing LED lights in a car?
The cost of installing LED lights in a car depends on several factors, including the type of light you want to replace, the number of lights to be replaced, the quality of the bulbs, and whether the installation is done by a professional or as a DIY project.
On average, the cost of LED lights can range from $50 to $200 per bulb.
Can fog light be added to a Toyota RAV4?
Yes, you can add fog light to a Toyota RAV4. Some higher trims also come with fog lights as standard, but they can be added to lower trims as well.
Does the Toyota RAV4 LE come with daytime running lights?
Yes, the Toyota RAV4 comes standard with daytime running lights (DRLs) as a standard feature. These lights improve visibility during the /daytime for more safety.
Can I install LED lights in my RAV4 by myself?
Yes, you can install the LED lights in your Toyota RAV4 yourself, all you need are the compatible lights and plastic wedge tools. You may also use a microfiber cloth to keep the bulbs clean. Basic knowledge such as that covered in this guide will also be sufficient.
How much does it cost to upgrade to LED lights in Toyota RAV4?
The cost of LED lights depends on many factors including the type of LED light you want to install such as a headlight, taillight, or different interior lights. But if you want an estimate, you need about $50 to $150.
What is the lifespan of the interior LED lights in Toyota RAV4?
The lifespan of LED lights is a great marker of reliability. On average, it can last up to 25000 to 50000 hours, depending on the quality of the bulbs.
What are the benefits you get by upgrading the interior lights in a Toyota RAV4?
LED provides a more focused and brighter light, uses less energy compared to halogen bulbs, and has a much longer lifespan. It comes with a touch of modern aesthetics as well.
Sources
The information in this article has been taken from RavGUIDE. The information on the products was taken from their product descriptions on Amazon.
Conclusion
Upgrading the RAV4 interior lights to LED lights is a massive improvement in the quality of light and will surely help you see your RAV4’s interior more clearly even when it is dark.
The AWLITED or Autogine brands are reputed for making quality LED lights. So check out their products and order them to see which one you like. You can follow the simple instructions I have given in this article to provide you with information on the steps you need to undergo to ensure a secure placement of the new lights.
If you have any questions, do not hesitate to comment down below to let me know. For now, happy upgrading!